Stitch School: Coral Stitch 2024.

For those of you who just stop by on Mondays, I did an extra embroidery post last week to answer some questions about materials from a reader. You can find it here if you missed it. And I’ll do an easy stitch today because I want to talk a little about fabrics for embroidery—something I neglected to talk about in the embroidery basics post.

So today we have coral stitch. Also called beaded stitch, German knot stitch, or snail trail, this stitch can be used singly to outline shapes, or worked in rows spaced closely together as a filling stitch, in which case you’ll want to position the knots between those in the previous row. Here’s how you do it:

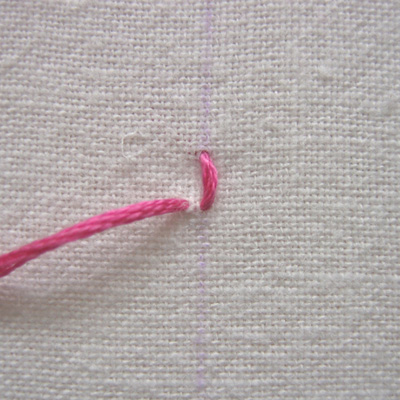
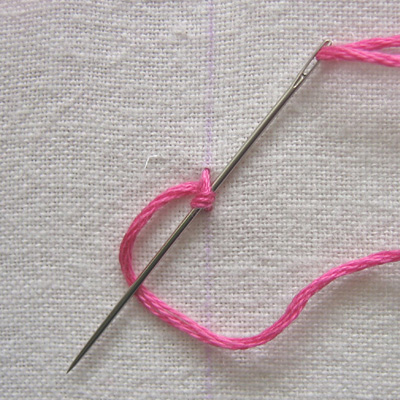
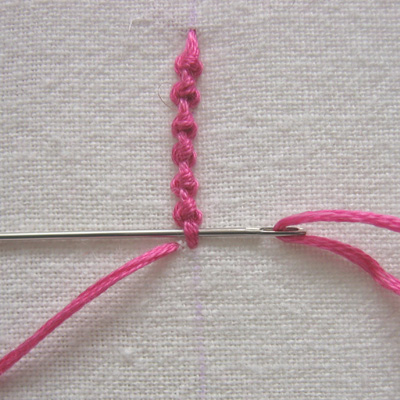
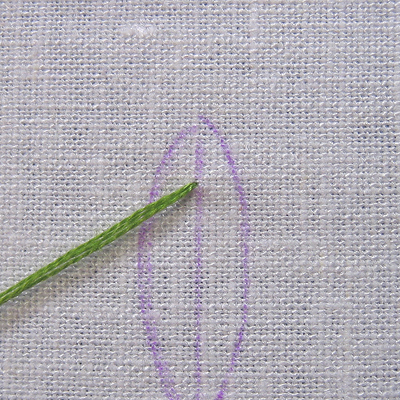
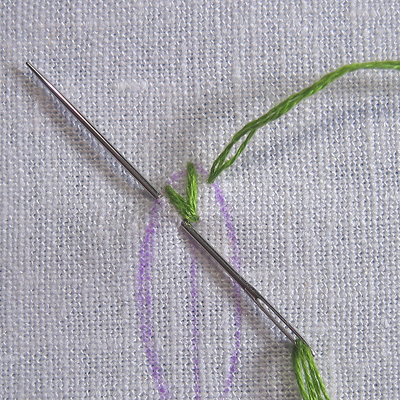
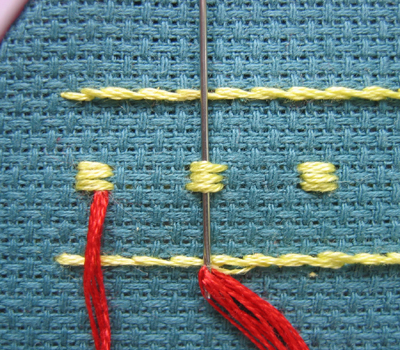
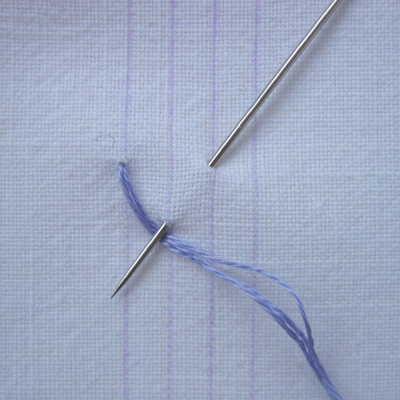
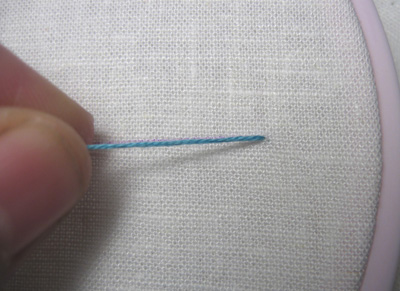
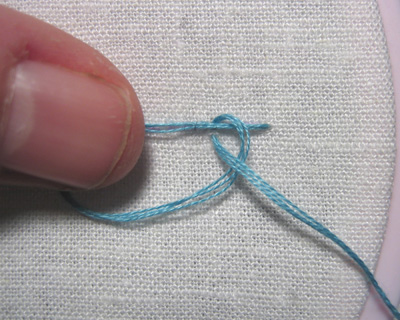
Bring your thread to the front on the righthand side of your line and lay it along the line for a short distance, holding it in place with your thumb.

الجيريا

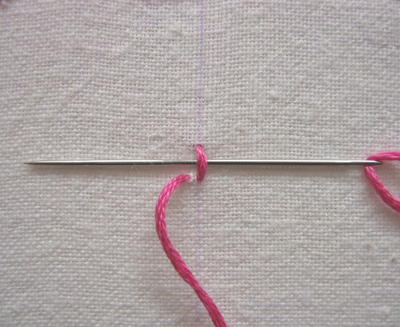
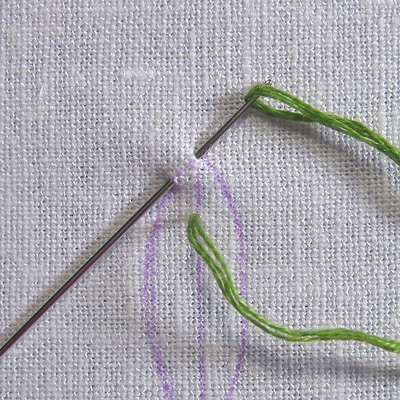
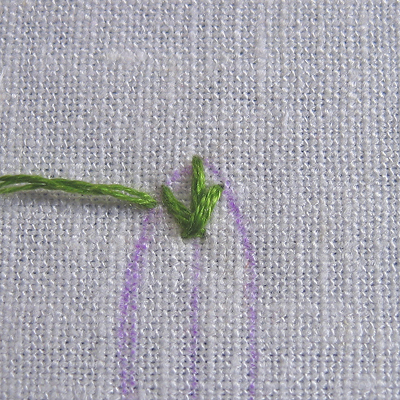
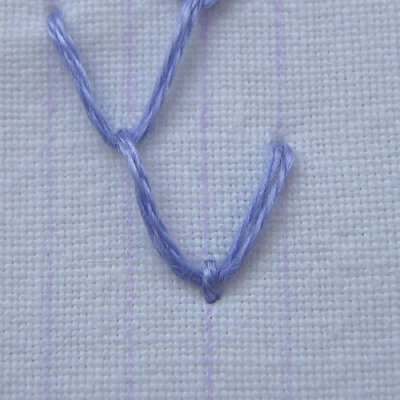
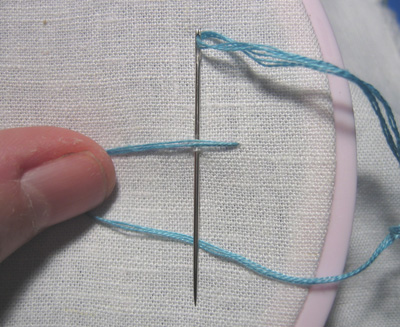
Keep holding the thread and take a small stitch from just above the thread to just below it. Your thread will form a loop and your needle should stay inside that loop.

الجيريا

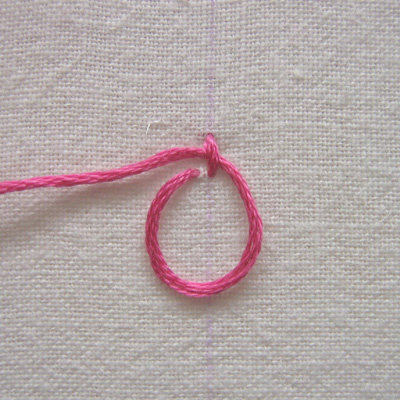
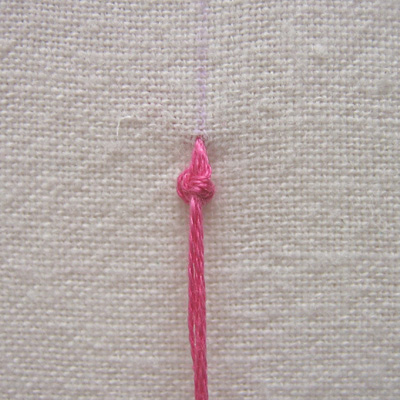
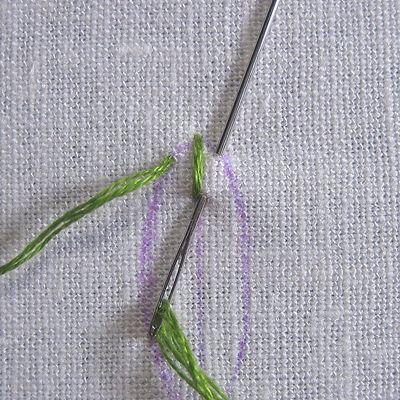
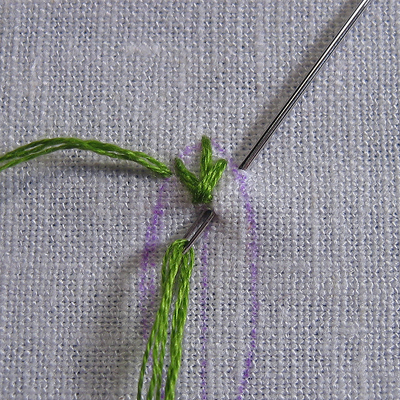
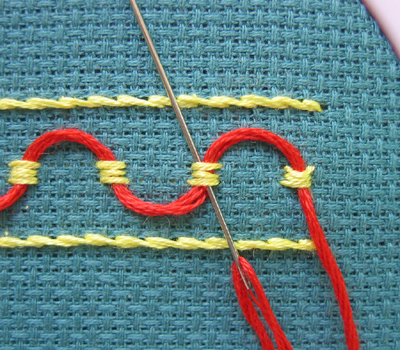
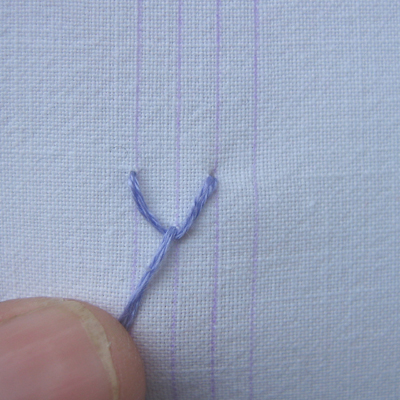
Keeping your thread taut, begin to pull it through until a knot forms.

الجيريا

الجيريا

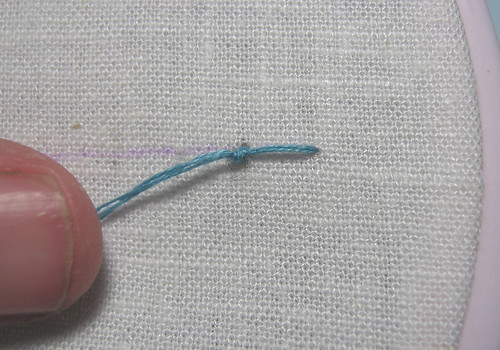
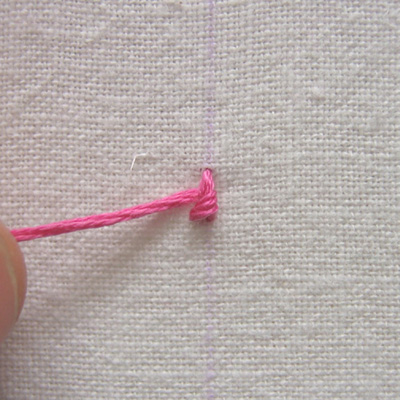
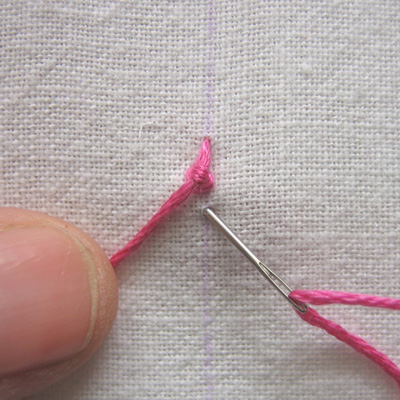
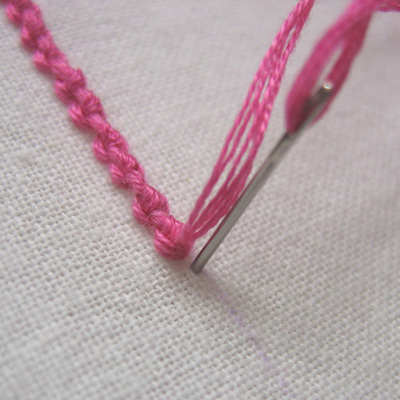
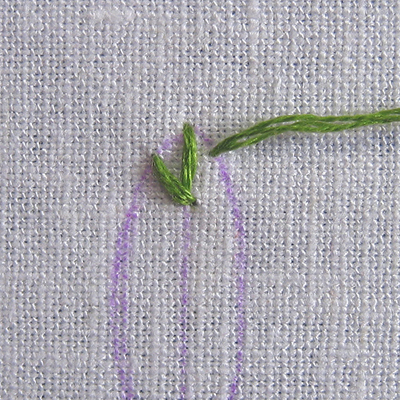
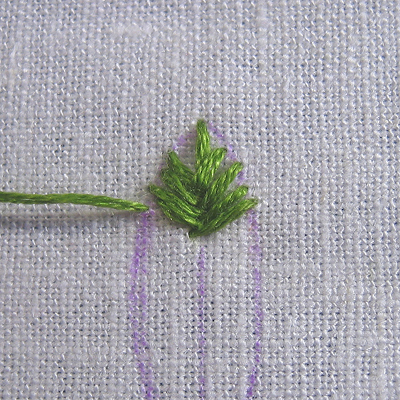
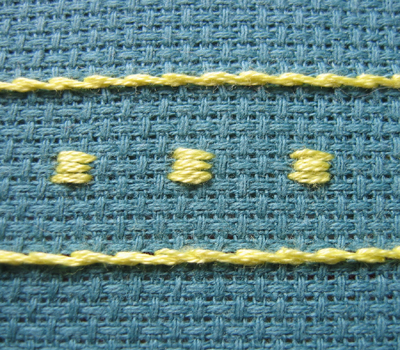
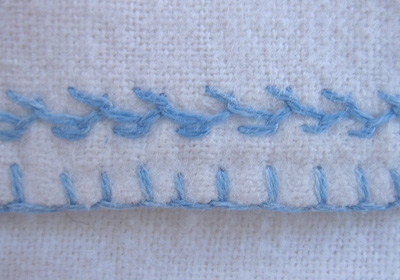
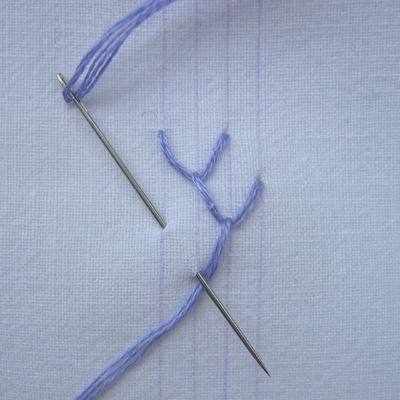
Lay your thread along the line again and take another small stitch in the same way. You can space your knots at whatever distance you like, just keep them evenly spaced as you continue along the line. When you come to the end take your thread to the back and end off (weave threads into back). That’s it.

الجيريا

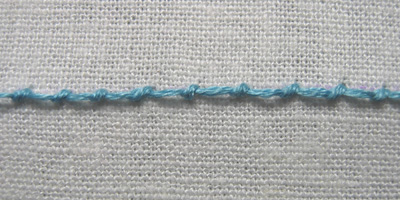
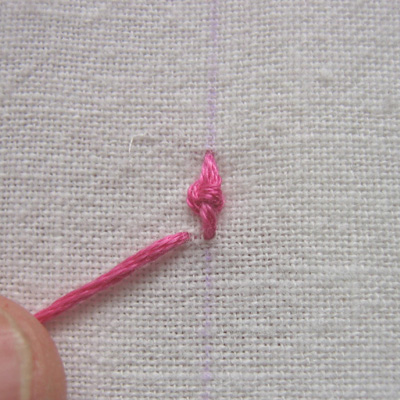
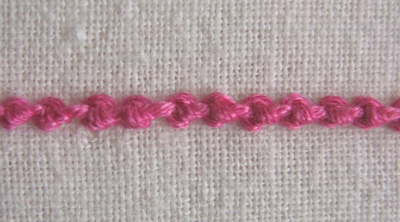
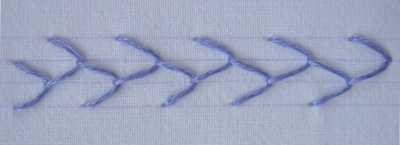
Here’s a side view so you can see the knots better.

الجيريا

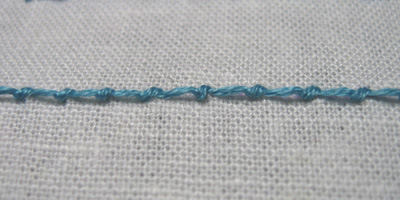
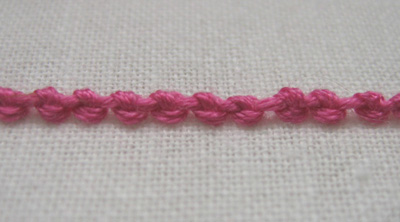
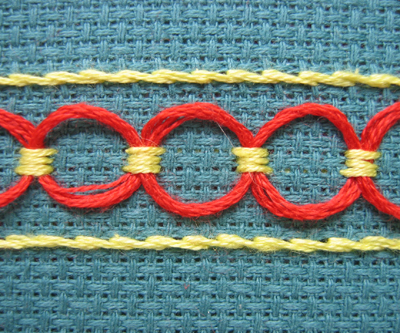
For a filling stitch, complete another row parallel to the first, spacing your knots so they fall in the open spaces between the knots on the first row. Then continue to alternate the knots as you fill your shape. Use a second color if you want a striped effect.

As always, past Stitch School posts can be found in the sidebar to the right.

Now, fabric. I mostly work on vintage stamped-for-embroidery projects so whatever fabric they’re printed on is what I use. That’s either linen or cotton and it usually has a weave that you can see. As a general rule, if you’re doing stitches that involve counting threads then you’ll want a fabric with threads that are easy to see—like linen or heavy cotton. If you’re doing a lot of outline, lazy daisy, satin stitch, or french knots, then a fabric with a finer weave (a finer linen or smooth cotton) will work better. Smooth cottons work best for iron-on transfer patterns, too. I like fabrics with some crispness as they’re easier to handle and stay in the hoop better without stretching and pulling. When you wash your finished project, that stiffness will usually wash out.

Many times, you’ll be embroidering linens that are designed and sold for that purpose—napkins, pillowcases, tea towels, baby bibs. In other words, the end product determines what fabrics you’ll be using. I buy my tea towels from Embroider This, and they have lots of other blanks for embroidering, too. And I often recycle parts of linens that I’ve used for other projects—like if I’ve used the embroidered edge of a pillowcase for a pillow, I save the rest to cut up and use for other things. You can embroider on just about anything so try some different fabrics and see what you like best.

This post has moved to it’s new home on the Stitch School blog. If you’d like to leave a comment please do so here.

مواضيع مميزة من غير ردود يا خسارة نتمنى لمنتدى الرقي والازدهار

هذه دعوة لكل بنات الجزائر خاصةة وكل البنات العربيات عامةةة

:daisy::daisy::daisy:

جزاك الله خيرا اتمنى من كل قلبي ندااااائك يصل ان شاء الله
الحقيقة ان الردود لن تكون بدون فهم للمحتوى وانا شخصيا ورغم شهادتي الجامعية لا اتقن الانجليزية جيدا فهل من معين ؟ شكرا مقدما
نشكرك بزاااف
والله اختي معك حق فاللغة الانجيزية غير متداول عندنا
و لكن موضوع في القمة
الله يعطيك كل خير
merciiiiiiiiiiii
شكرا
لكن الغرزة باينة لو تتبعوا الشرح في الصور
بارك الله فيك حنان

Stitch School: Palestrina 2024.

Palestrina stitch, which is also called old English knot, double knot stitch, and tied coral stitch, creates a line of raised knots that is useful for creating outlines and borders. The secret is to keep your knots evenly spaced and fairly close together. Here’s how to do it:

Draw a straight line on your fabric to use as a guide in keeping your stitched line straight. Take a short straight stitch from top to bottom on the line. After pulling your thread through, come up again just to the left of the bottom.

الجيريا

Pull the thread through, then slide your needle from right to left under the first stitch making sure you don’t pierce the fabric.

الجيريا

Pull the thread through gently until the loop that is formed with your thread fits snug against the straight stitch.

الجيريا

الجيريا

Make a loop to the left with your thread, then slide the needle from right to left diagonally under the straight stitch and looped knot. Keep your needle on top of the loop and again, don’t pierce the fabric.

الجيريا

Gently pull the thread through until it forms a knot over the previous one.

الجيريا

Begin the second knot by taking your thread to the back a short distance below and slightly to the right of the previous knot. I found that if you work directly on the line it tends to curve to the left.

الجيريا

Bring the needle up to the left of the line and straight across from where your needle emerged.

الجيريا

Repeat the previous steps, forming another knot. Then continue working knots along the length of the line until you reach the end.

الجيريا

Take your needle to the back close to the last knot.

الجيريا

Voila!

الجيريا

And a side view so you can see how they’re raised off the surface.

الجيريا

Note: I used six strands of floss so the knots would be nice and chunky for the photos; using the standard three will make a more delicate stitched line.

Links to previous Stitch School posts can be found in the sidebar at the right for those of you just joining in or if you missed one. Happy stitching!

رائعة
انا اخدمت مخايد لولادي و بروديتهم بهدا Le point de palestrina اخرجولي روعة يعطيك الصحة
جزاك الله خيرا على كل إفادة شكرا
رووووووووعة
ترى متى اعمل مثلها واتدكر ايام التطريز
راااااااائع بارك الله فيك

Stitch School: Fishbone 2024.

The fishbone is another stitch with a plaited center that’s perfect for embroidering leaves, feathers, or wings. The stitches cross slightly at the center and the resulting plaited effect forms the central rib. I’ll do a variation called raised fishbone next week where the thread crosses over and behind the center. It raises the thread up a bit so it has a nice padded effect.

I’ve drawn a fat leaf shape with a center line that I’ll fill with stitches, but this will work equally well for thinner and curvier leaves—like ferns (see more about that below). So, start by bringing your thread up on the center line near the top of the leaf.

الجيريا

Take the needle from the very top point of the leaf to a point along the left side that’s at an angle to where the thread starts. Keep your thread to the right.

الجيريا

Pull your thread through. With your thread to the left, take your needle from a point slightly to the right of your first stitch to a diagonal point on the leaf outline.

الجيريا

Pull the thread through. This is the first half of the completed stitch.

الجيريا

With your thread to the right, take the needle from a point slightly to the left of the previous stitch and angled up towards the left side of the leaf outline. You’ll see that your thread crosses over the bottom of the previous stitch.

الجيريا

Pull your thread through to complete one stitch.

الجيريا

Now with your thread to the left repeat on the right side.

الجيريا

And again on the left (I’ve jumped ahead a little here—there’s a couple of stitches taken in between).

الجيريا

Continue stitching, alternating from left to right, until you’ve completely filled the leaf shape.

الجيريا

For a curved shape, increase the distance between the stitches on the outside curve and decrease the space on the inside curve. The sharper the curve, the greater the distance between the stitches on the outside line.

Again, sorry for the delay. It’s been one of those weeks. And I’m now heading outdoors to start cleaning up some of the 13 inches of snow we’ve gotten since last night. It’s still snowing so this should be an adventure.

روعه هالشغل كتير عنا في الاردن بنسميه شغل الطاره ونعمله على الشراشف والخدات والملابس وهو غالي جدا جدا وارجو ان يكون الشرح بالعربي لانه انجلزيتي على قدها شوي شـكــ وبارك الله فيك ـــرا لك … لك مني أجمل تحية .
مشكووورة الجيرياالجيريا
اللون الاخضر جميل جدا
شكرااااااااااا لك
غرزة رائعة بارك الله فيك حبيبتي حنان

وردة جميلة لدفتر جميل «Back To School « 2024.


اهلا اخواتى

زينى ورقات دفتر ابنائك بوردة جميلة من الورق المقوى والالوان والغراء

حيكم

الجيريا

الجيريا

الجيريا

الجيريا

الجيريا

ممكن استخدام الفكرة في عمل ارقام للصفحات او صور حيوانات

الجيريا

الجيريا

الجيريا

بالتوفيق والنجاح
كل عام وانتم بخير

Stitch School: Guilloche 2024.

Another stitch from Erica Wilson’s Embroidery Book is the guilloche. From the French verb guillocher, which means to ornament with line. This is a border stitch and it uses a combination of two parallel stem stitched lines and a series of small blocks formed from three straight stitches in between. A second thread is woven through to make circular spaces for the French knots to be placed inside. All of which makes for a nice way to work in a lot of color.

Start by embroidering two parallel lines of stem stitch about an inch apart. Then work small blocks of three straight stitches each, horizontally across the center space, keeping them evenly spaced between the lines of stem stitch and from each other.

الجيريا

Then, using a blunt needle, slide through these blocks as shown. Leave the thread loose so that it curves instead of forming a sharp "V". You have to really work to keep them even (and I didn’t do a perfect job of it myself).

الجيريا

الجيريا

الجيريا

Finally, work one French knot in the center of each circle.

الجيريا

I worked with aida cloth this time because it’s really important that the spaces in between are even. You could use linen, too, and count carefully when you make your blocks of three lines.

If you’re just joining us, you’ll find a list of past Stitch School posts in the sidebar. Also helpful if you need a refresher for some of the basics used in these combination techniques!

merci bien
مشكورة غاليتي على موضوعك الرائع
mille merci
يهبلو تع الصح

Stitch School: Feather Stitch 2024.

Feather Stitch is a little more advanced than some of the stitches we’ve been doing but I think you guys can handle it. It’s a delicate-looking stitch and is often used on baby and children’s clothing, like the sacque I showed you last week and am repeating here:

الجيريا

It’s also a common stitch for embroidering crazy quilts. This example is done with two colors of thread.

الجيريا

It will help a lot when doing this stitch (at least at first) if you mark your fabric with four parallel guidelines. I like to use one of those fade out quilt markers that make a purple line that disappears in a couple of days. You can also use the blue ones that will wash out. If you’re just practicing use a pencil or thin marker.

To start bring your thread to the front on the first line. Holding the thread down with your left thumb, insert your needle on the third line even with where the thread emerges. Then, working downward and diagonally, come up on the second line.

الجيريا

Keeping the thread under the needle point pull the thread through to make the first stitch.

الجيريا

Now insert your needle on the fourth line and parallel to where your needle emerged on the last stitch. Come up again on the third line.

الجيريا

Do the same thing again with the needle down on the first line and back up on the second. Continue working back and forth across the lines. You’re essentially making a series of scallops that are held in place by the beginning of the next stitch.

الجيريا

To finish, take a tiny stitch over the last loop.

الجيريا

And here’s what it looks like finished. I have to admit that this is the first time I’ve tried this stitch and, although it looks kind of tricky, it’s really very easy. You’ll be zipping along in no time at all.

الجيريا

The look of this stitch will vary greatly depending on the angle of the needle, the length of the stitches, and how far apart your guidelines are. Once you’ve got the basics down, don’t be afraid to experiment to get some different looks. I’ve posted a diagram of some variations on my Flickr account so you can see them nice and big. And how cool would this look with French knots in a second color in between the loops?

While we’re on the subject of crazy quilts, let’s do herringbone stitch next week.

And if you’ve missed any of the lessons in this series, there’s a handy list of previous Stitch School posts in the menu to the right.

الصراحة غرز تطريز جميلة جدا

و انا من عشاق التطريز اليدوي

بارك الله فيك اختي

السلام عليكن
اريد ان اسئل اخواتي عن ماكنة التطريز بالكمبيوتر انواعها واسعارها من فضلكن في اقرب وقت
شكرا لقد عملت الطريقة 1
فعلا غرزة رائعة تستحق التجريب